Umantis Email Connect
The Umantis Email-Connect offers you the option of automatically uploading emails to your Applicant Management system. You can link (synchronize) one or more folders of your email account with Applicant Management. It is also possible to link several email addresses to your user
Authorized roles for synchronization
The following User roles are authorized to configure the Umantis Email-Connect for themselves. This means that these roles can synchronize their own mailboxes:
- Administrator
- HR expert
- Personnel assistant
- Line manager
Compatibility/system requirements
The Umantis Email-Connect is currently only compatible with Outlook. In order to use it, you need Outlook 2003 or higher. The Umantis Email-Connect is also compatible with all common Exchange servers. If you run your own Exchange server and are unsure whether it is compatible with the Umantis Email-Connect, please contact our support team.
Displaying the Umantis Email-Connect
If the Umantis Email-Connect is not yet visible for you, you need administrator access to your Applicant Management to activate the display.
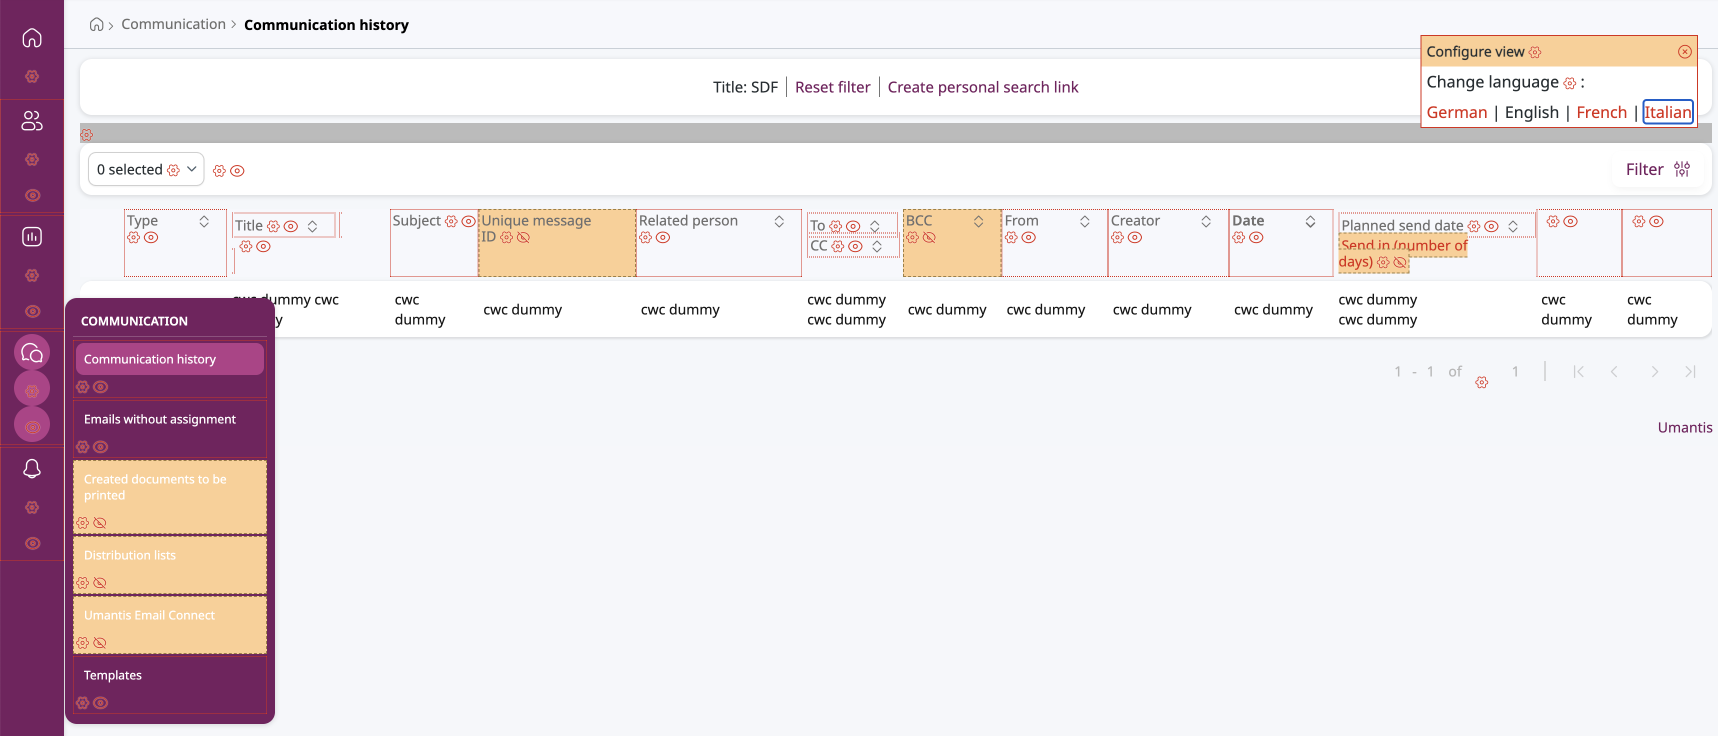
Use the Configuration mode to display the required menu item in your Applicant Management. Navigate to the menu item “Communication” in the main menu. Here you will find the new tab “Umantis Email-Connect”. If this is still hidden in your system (see image), you can make it visible by clicking on “Show” (marked by an arrow in the image).
Technical setup
After you have displayed the menu item and exited the customize view mode, please click on the menu item “Umantis Email-Connect”. As soon as the page has loaded successfully, you will see the configuration screen. This is where the synchronization of your mail account (mailbox) takes place.

Click on “Link mailbox” to start the process of integrating your email account. You will then be guided through the process of linking your email account. In the first step of the process, you will be asked to define your email account. ![]() Note: Synchronization is currently only possible with Outlook accounts.
Note: Synchronization is currently only possible with Outlook accounts.

After clicking on “Continue with Microsoft”, you will be asked to enter your access data for your mail account.

You will also be asked to authorize the integration to access your emails. This is necessary for the Umantis Email-Connect to work. Once you have provided the necessary information and the process is complete, your email account will be connected to your Applicant Management system. It may be necessary for you to refresh the page after completing the process so that all data and your folder structure can be loaded correctly.

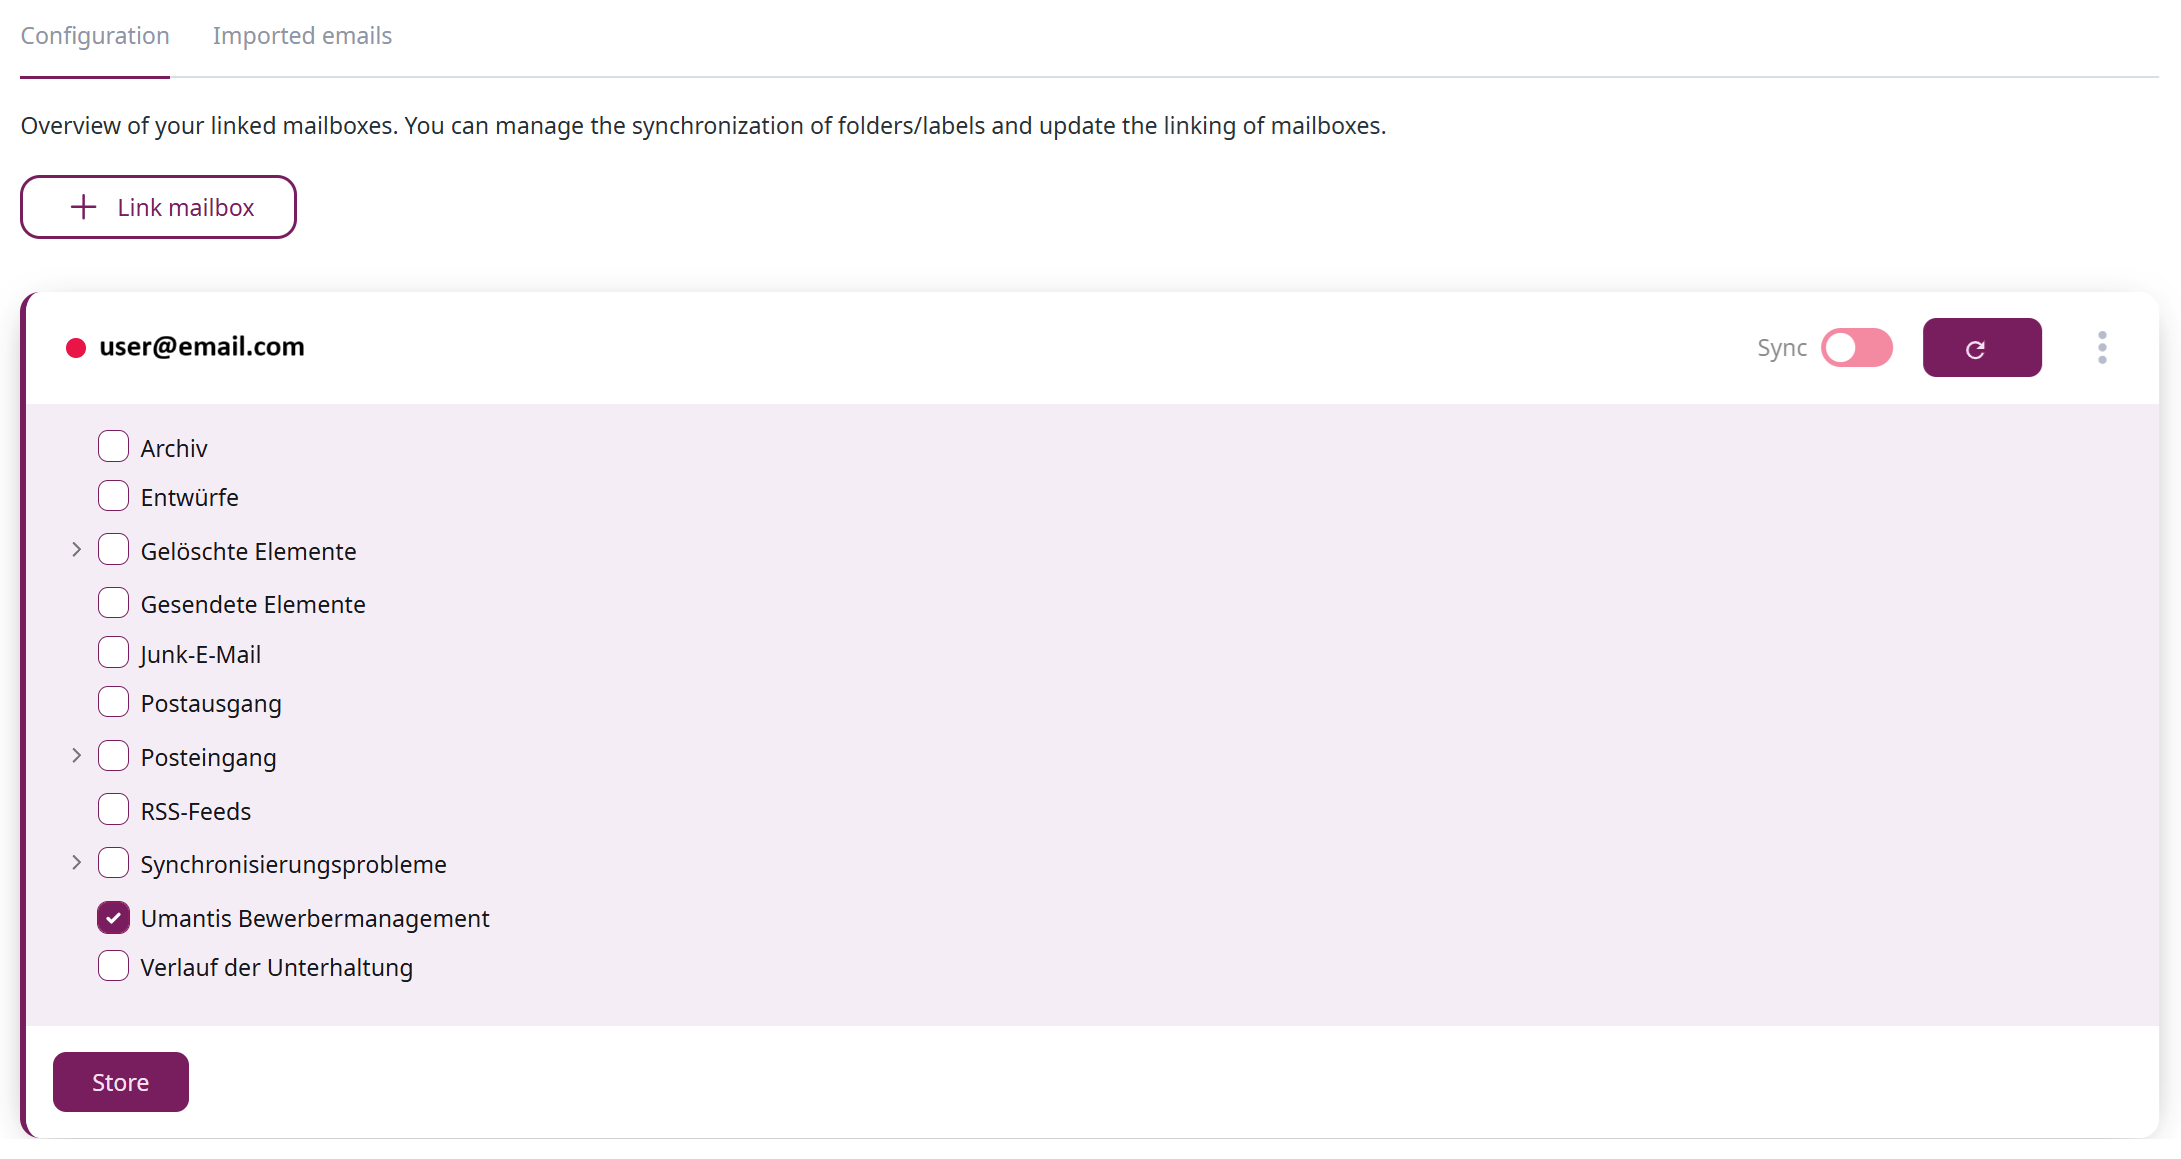
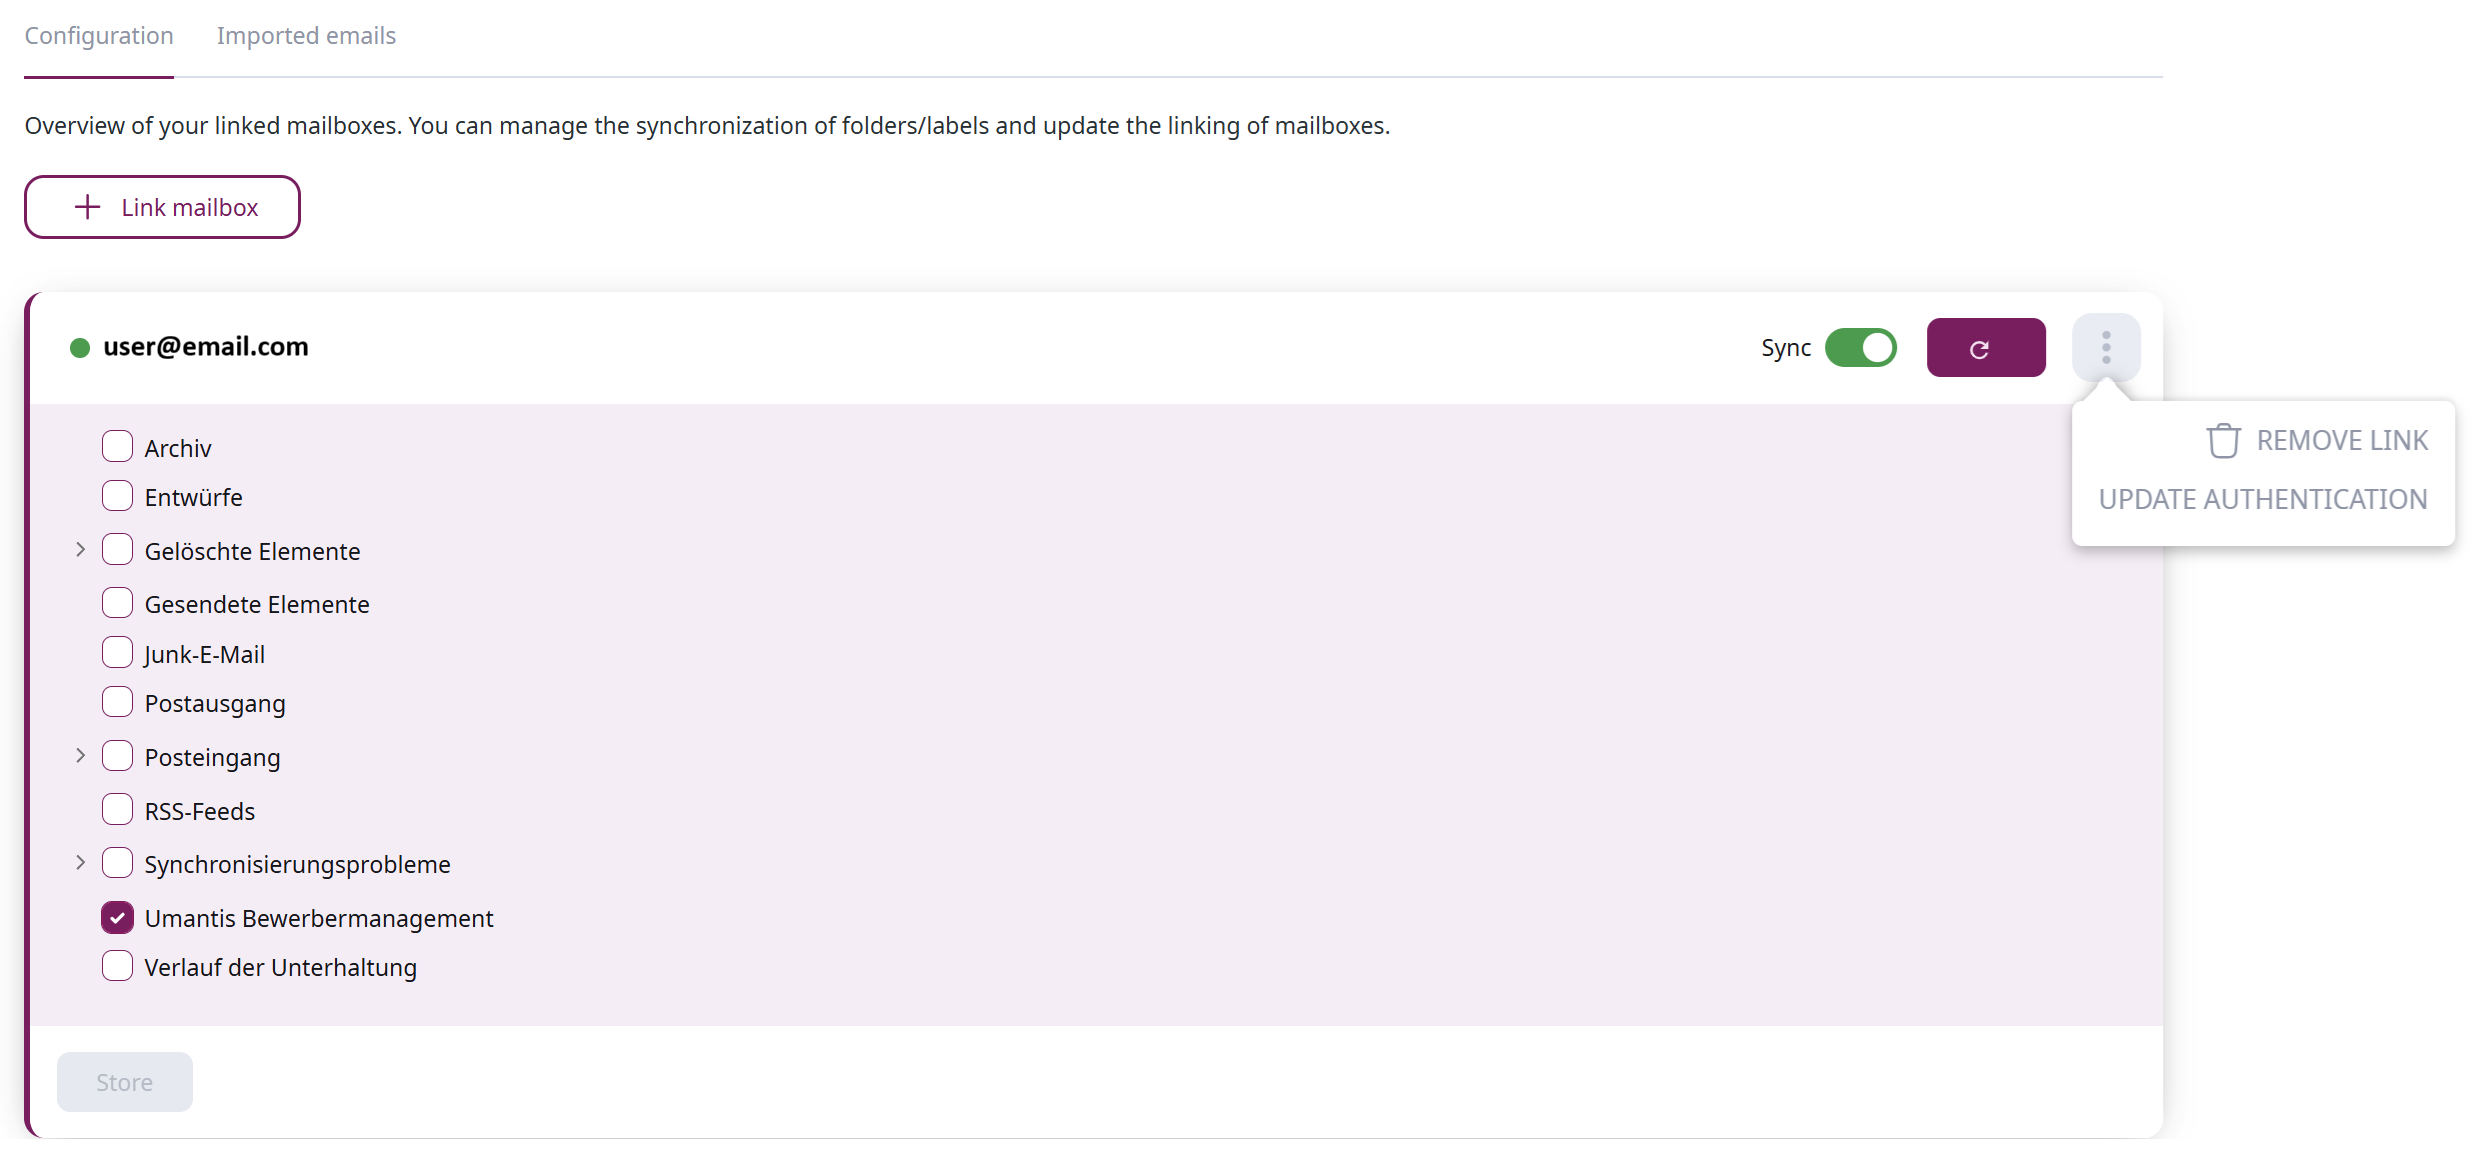
Selecting the folders to be synchronized
To synchronize one or more of your folders with your Applicant Management, you must first check the box to the left of the folder title for the folder or folders you want to synchronize. Ticking the box does not trigger synchronization!
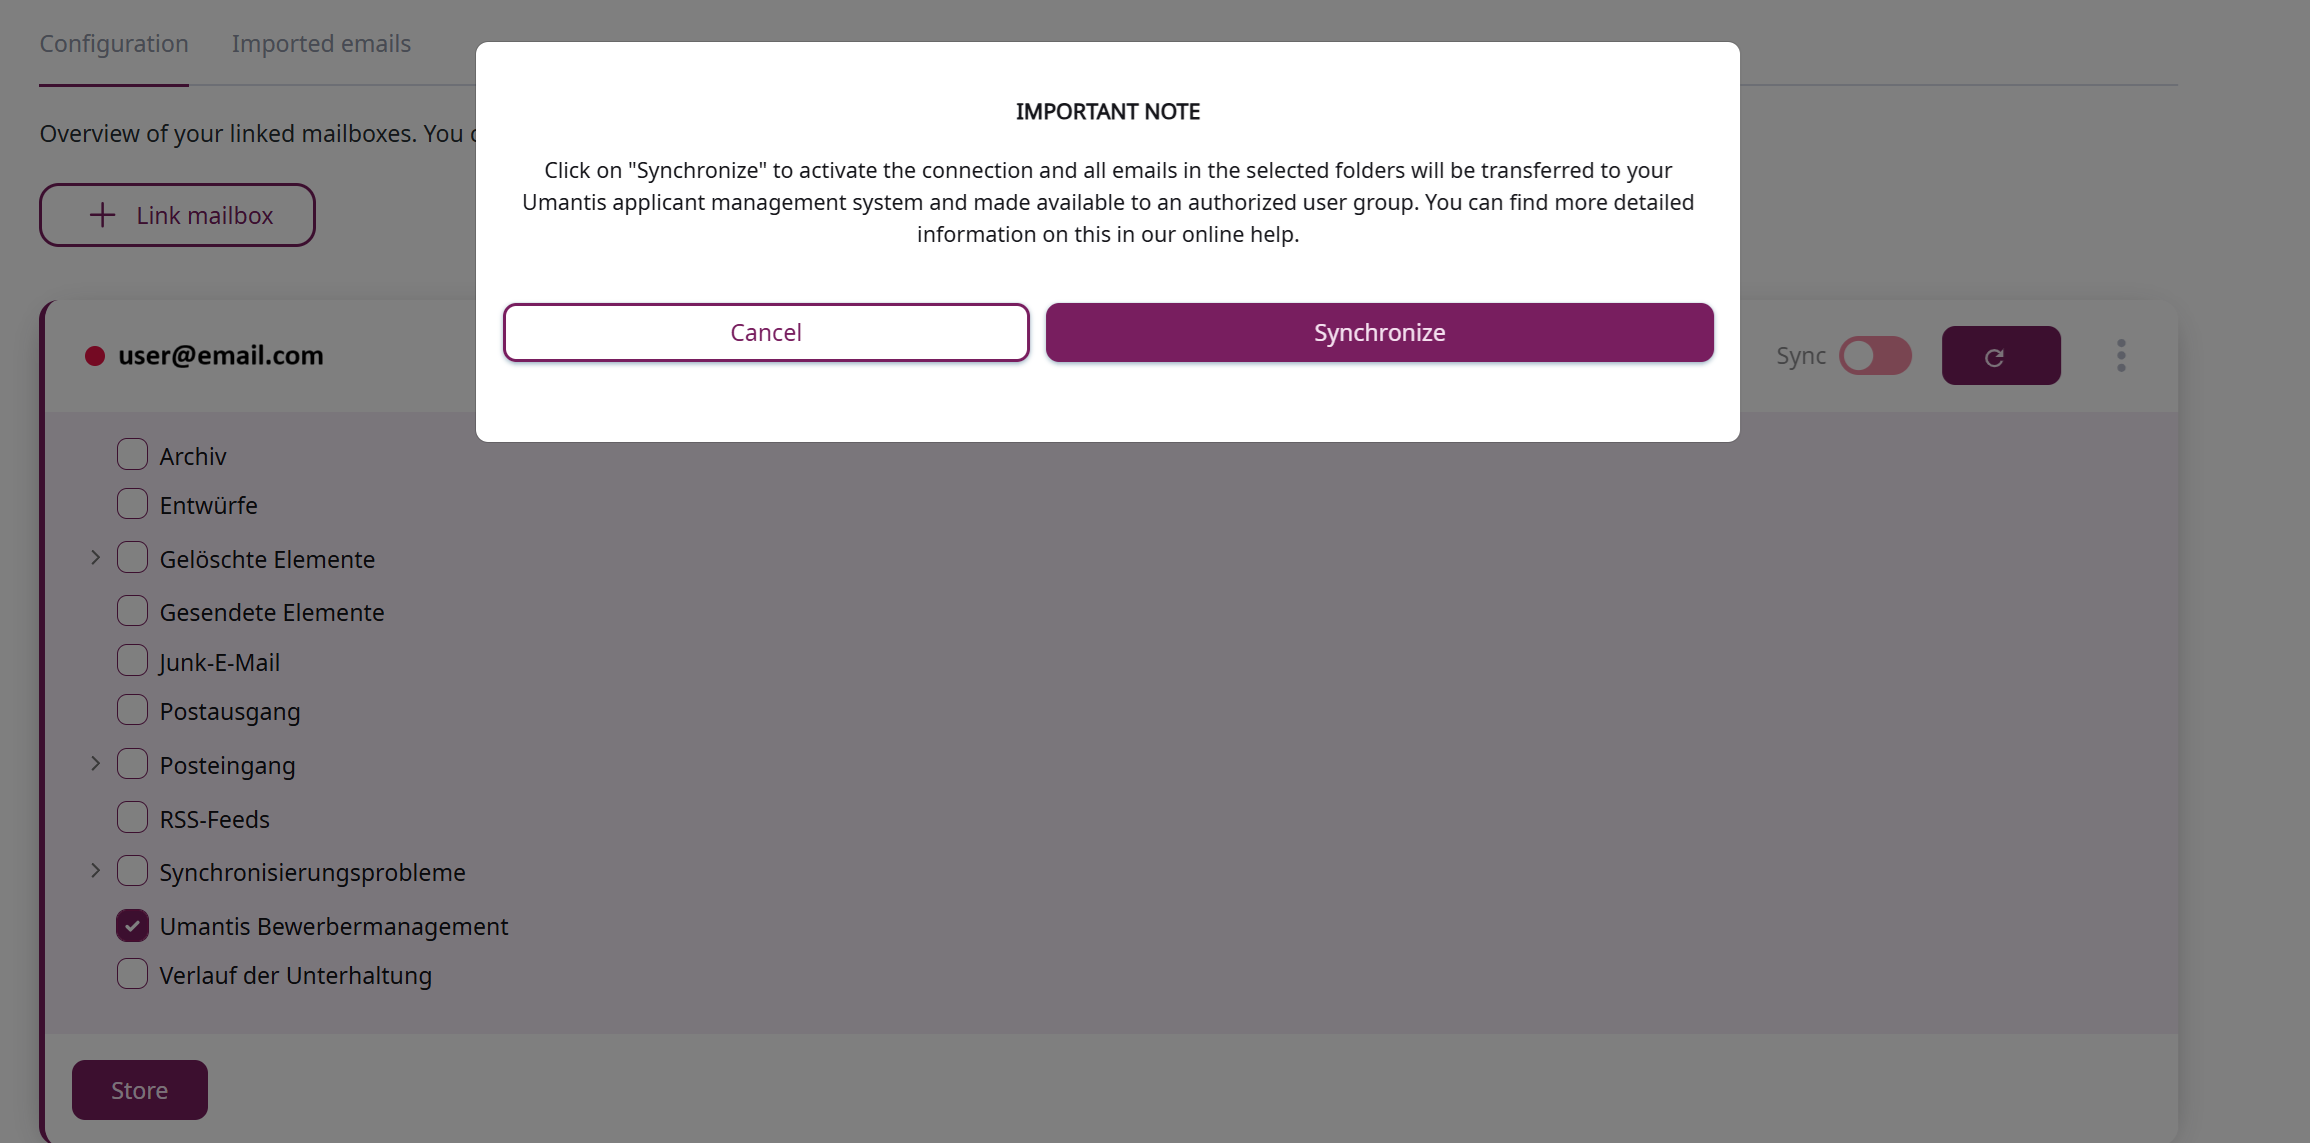
As soon as you have made your selection, click on “Save” under the display of your folders. You will see a warning message informing you that you can activate the connection between your email account and your Applicant Management by clicking on “Synchronize”.
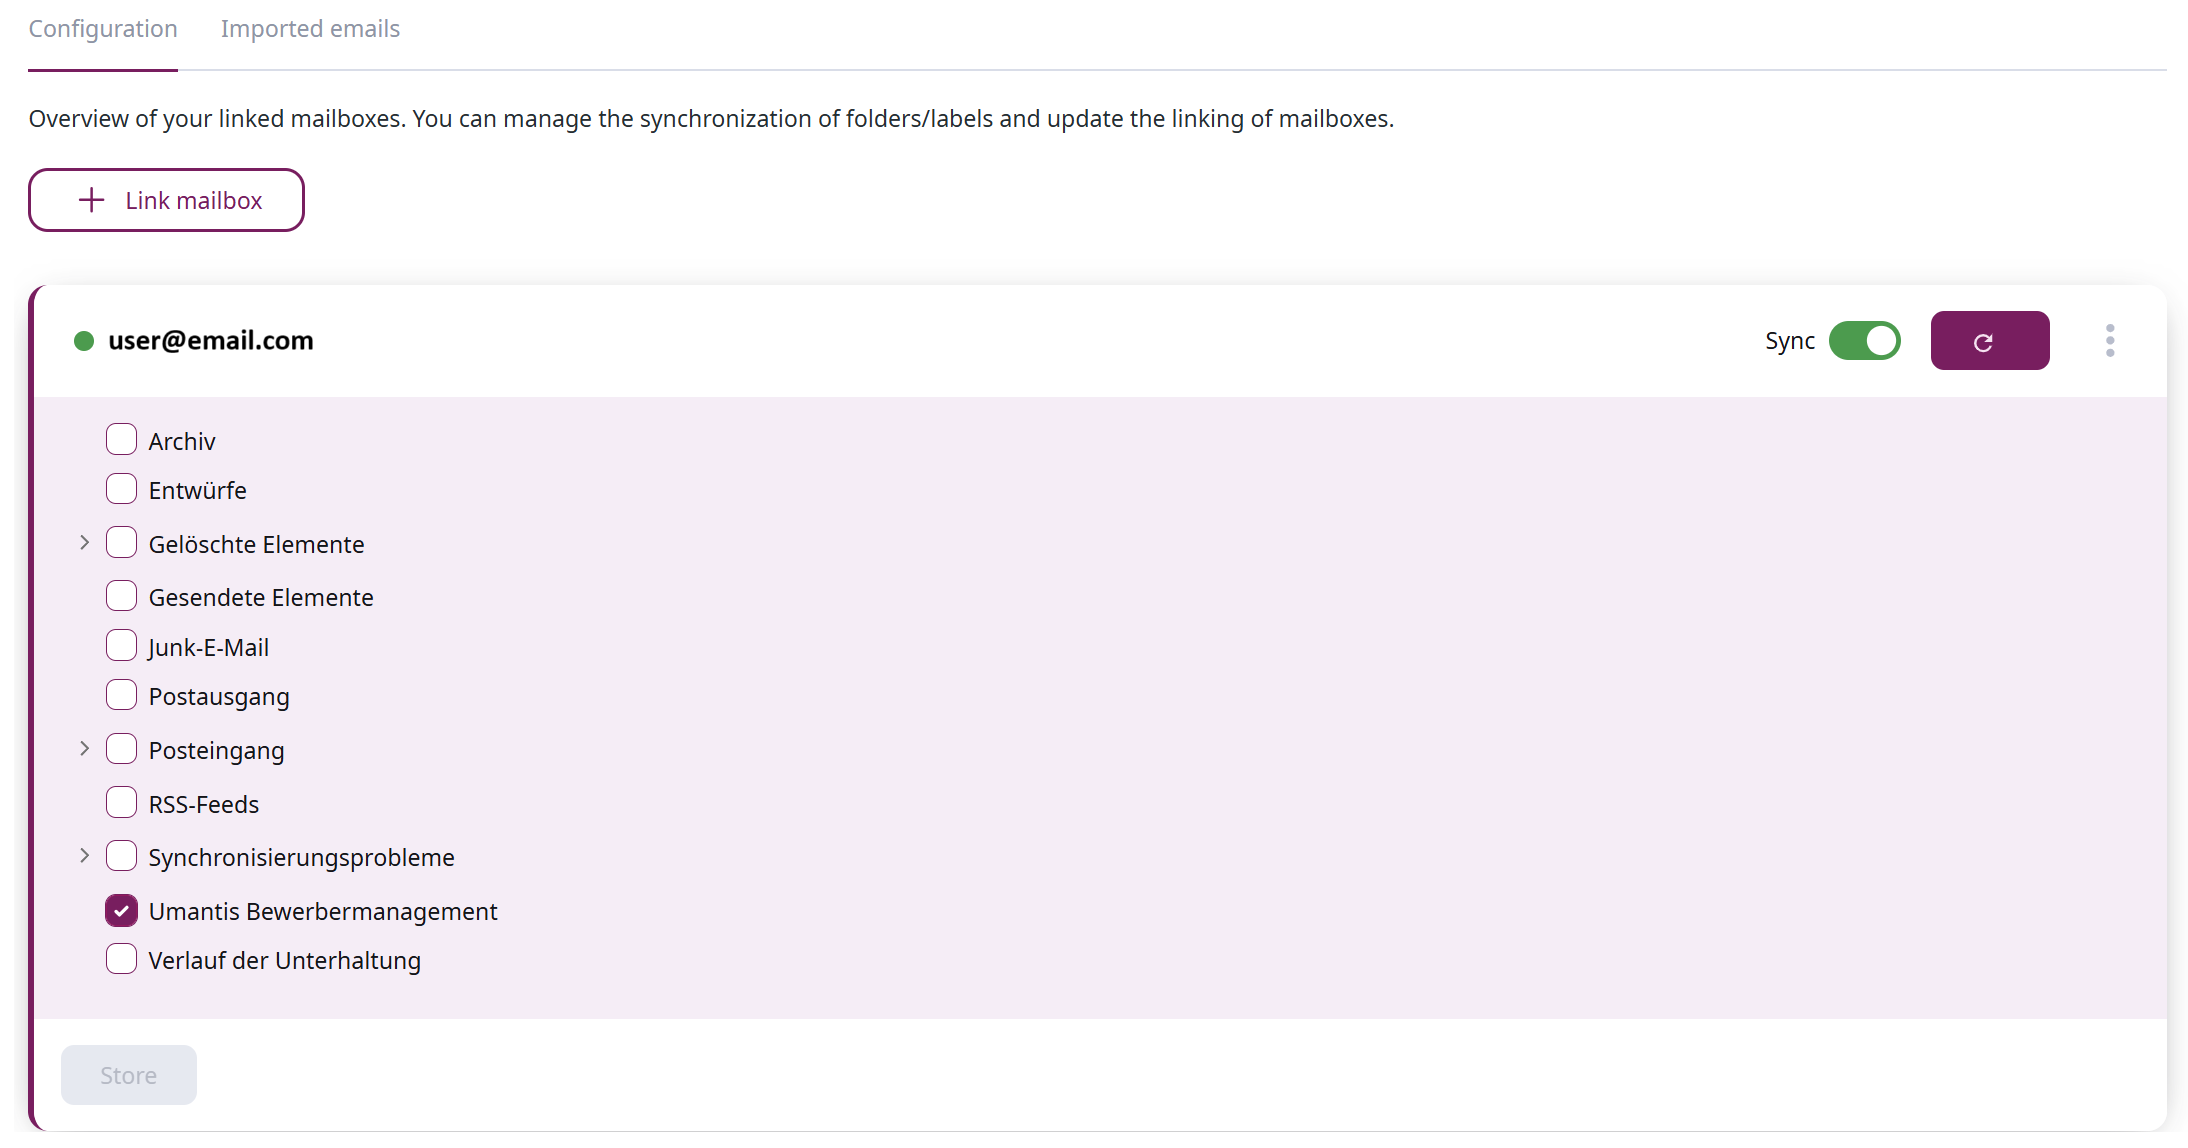
If you now wait a moment, the “Sync” button will automatically turn green. The emails from the folders you have selected will now be synchronized with your Applicant Management.
Exiting the synchronization
To disconnect the connection between your email account and your Applicant Management, simply click on the three-dot menu next to the “Sync” button. In the menu that now appears, select “Remove link” and confirm that you want to remove the link in the pop-up window that now appears.
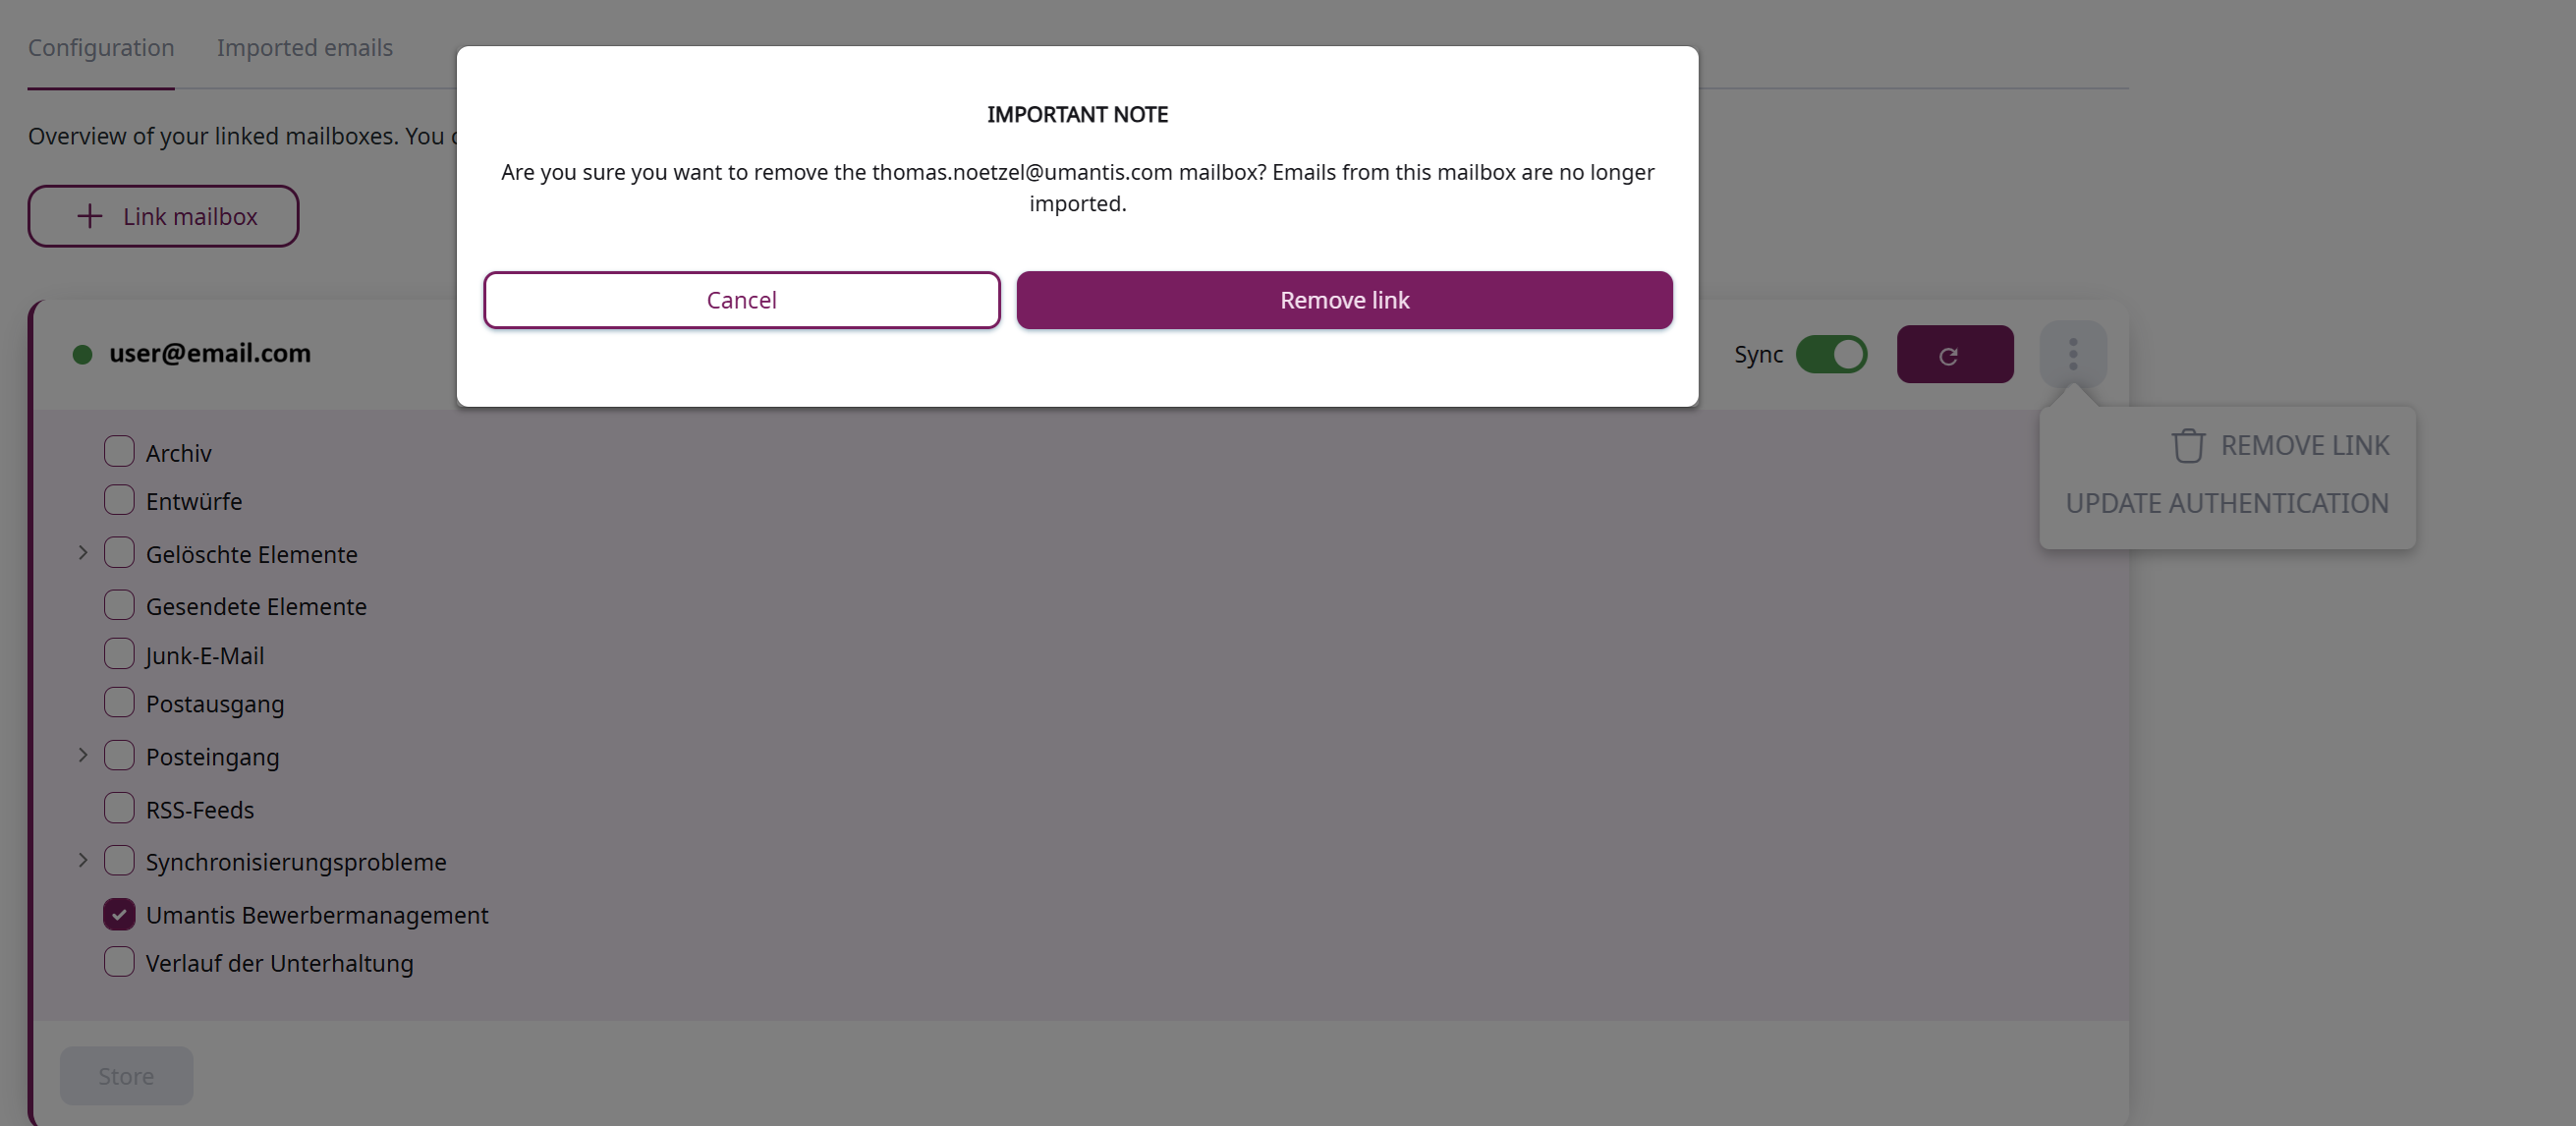
If the removal of the link was successful, you will no longer see an email account and you will receive a message telling you that the deactivation of the link was successful. No more emails from the previously linked account will be uploaded to your Applicant Management.
Update authentication
If the access data for your email account has changed, this can be adjusted via the “Update authentication” entry in the three-dot menu. You essentially go through the same steps as for the initial setup.
Using the email connection
 General information
All emails from the folders you have selected will be uploaded to your Applicant Management system. We try to link the emails directly to the corresponding applicants. If this is not possible without any doubt, the email will be stored in the system as an “email without assignment”. You will then find these emails under the “Communication” menu item in the “Emails without assignment” tab. Emails that are assigned to an applicant can only be seen by users who are authorized to see the applicant. Emails without an assignment can be viewed by all users with access to the tab. Only emails that are dragged into the selected folder after synchronization has been activated or that are automatically moved to the synchronized folder by a defined rule in Outlook are synchronized. Emails that were already in the folder before the first synchronization are not synchronized.
E-mails without assignment
![]() Information about Who sees what here?¨
Information about Who sees what here?¨
If we cannot assign an email to a specific application, this email will be displayed in the Emails without assignment tab under the Communication menu item.

To assign an email, select it by clicking on the selection field to the left of the email title. You have the option of selecting one or more emails. If you select several emails, please note that you can only select one action for all selected emails.

You have the option to:
- assign it to an existing application
- assign it to a new applicant
- assign it to an existing recruiter
- assign it to a new recruiter
- delete the email/emails
After you have selected the action to be executed, click on the “Play button” next to your selection.
![]()
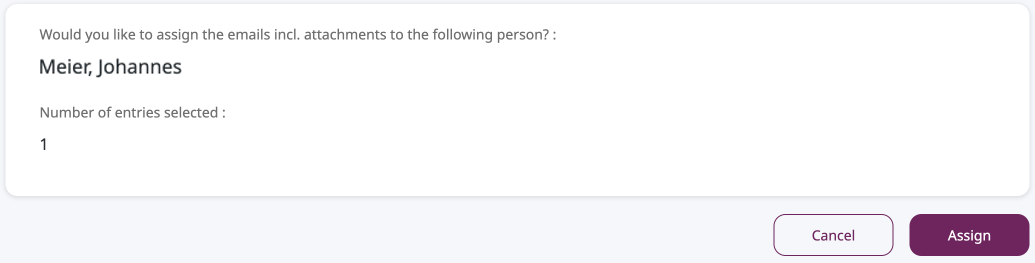
Assign to an existing application
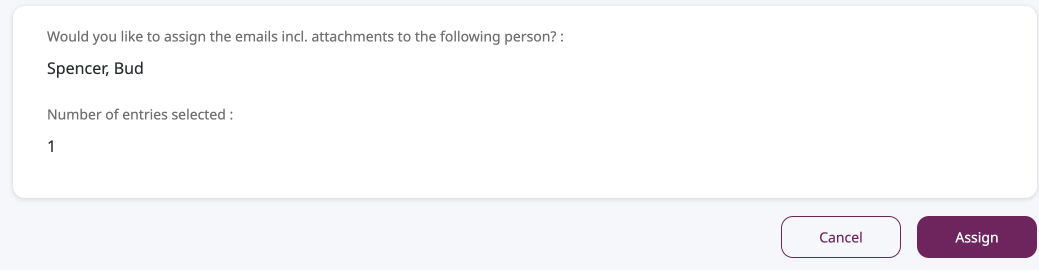
If you want to assign an email to an existing application, select the respective email from the list of unassigned emails. Once you have made your selection, select the “Assign to existing application” action and confirm this by clicking on the “Play button” that now appears.
You will now be redirected to a search page. You will be offered various options to find the respective applicant. Once you have found the relevant applicant, select them by clicking on the selection field to the left of the relevant applicant.
Confirm your selection by clicking on “Select”.

You now have the opportunity to check your selection again. If you are satisfied with your selection, click on “Assign”.
Assign to a new applicant
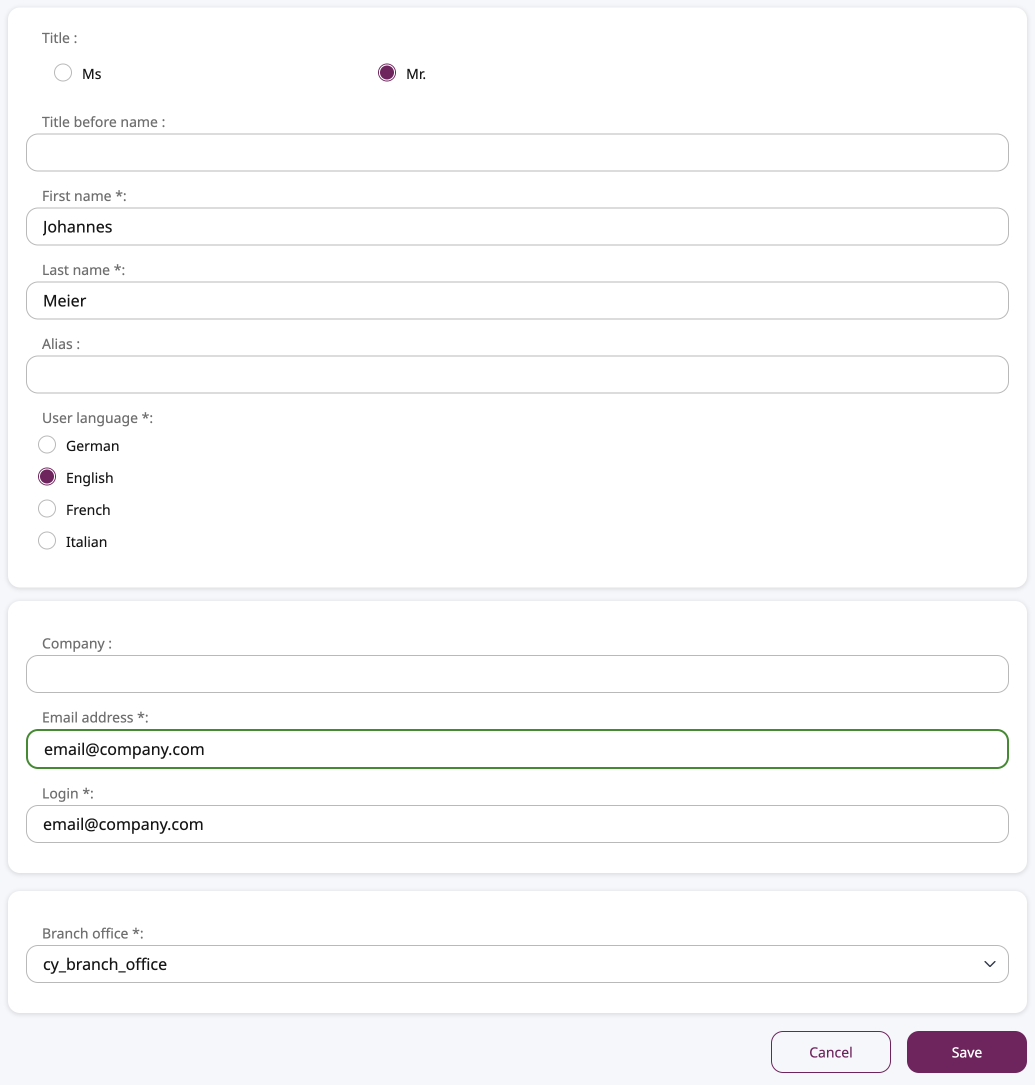
If you want to assign an email to a new applicant, select the respective email from the list of unassigned emails. Once you have made your selection, select the “Assign to new applicant” action and confirm this by clicking on the “Play button” that now appears.
On the following page, you have the opportunity to add some information about the applicant and upload further documents.
As soon as you have added all files to the application and completed the applicant details, confirm your selection by clicking on “Save”.

Once you have entered all the required information, you have the opportunity to check the information you have entered again. If you are satisfied with the details, click on “Assign”. Of course, you also have the option of adding information and documents to the application at a later date.

Assign to an existing recruiter
If you want to assign an email to an existing recruiter, select the respective email from the list of unassigned emails. Once you have made your selection, select the “Assign to existing recruiter” action and confirm this by clicking on the “Play button” that now appears.
You will now be redirected to a search page. You will be offered various options to find the relevant recruiter. Once you have found the relevant recruiter, select it by clicking on the selection field to the left of the relevant recruiter.
Confirm your selection by clicking on “Select”.

You now have the opportunity to check your selection again. If you are satisfied with your selection, click on “Assign”.

Assign to a new recruiter
If you want to assign an email to a new recruiter, select the respective email from the list of unassigned emails. Once you have made your selection, select the “Assign to new recruiter” action and confirm this by clicking on the “Play button” that now appears.
On the following page, you have the option to add some details about the recruiter. Confirm your entries by clicking on “Save”
After you have entered all the required information and clicked on “Save”, you have the opportunity to check the information you have entered again. If you are satisfied with the details, click on “Assign”.
Delete email
If you want to delete an email, select the respective email from the list of unassigned emails. Once you have made your selection, select the “Delete” action and confirm this by clicking on the “Play button” that now appears.

On the following page, you will be asked to confirm the deletion of the email. Among other things, the number of emails selected will be displayed here. Once you have checked the details, click on “Delete”.
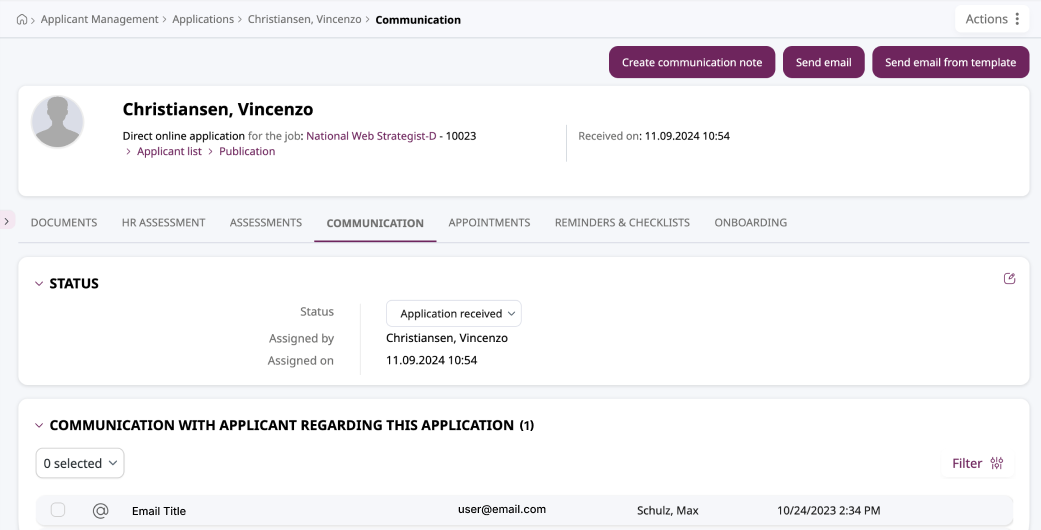
Emails assigned to an applicant
Emails that can be assigned to an applicant can be found in the communication overview for the respective applicant.
FAQs - Questions and answers
- How long does it take for newly created folders to be displayed in the folder selection for synchronization?
- It may take a few minutes for newly created folders to appear in the folder selection for synchronization. Please be patient.
- How often are the folders and emails synchronized between Applicant Management and Outlook?
- The synchronization of folders and emails between Applicant Management and Outlook can take several minutes.
- What role do I need to have in order to use the Umantis Email-Connect?
- There are no technical restrictions on the use of the Umantis Email-Connect. However, the administrator can show or hide the feature so that it is not visible to every user role. Please contact your administrator if you do not have access.
- Are all email accounts connected to Applicant Management visible to everyone in Applicant Management?
- No, the email accounts are only visible to the users with whom they have been registered. However, emails that have been uploaded to Applicant Management may be visible to others, depending on the Applicant Management settings and the individual user's authorizations.
- Is it possible to connect our central mailbox for applications with our Applicant Management?
- Yes, you can connect any mailbox that has its own login details. If the mailbox is used by several users, please note that each mailbox can only be connected to one account in Applicant Management.
- What happens if I delete a folder in Outlook?
- If you delete a folder in your Outlook account, it will no longer be synchronized with your Applicant Management and will disappear from the folder overview. However, emails that have already been synchronized will remain in Applicant Management. If you want to delete the emails, you must do this manually.
- What happens if I move a folder in Outlook?
- The folder should continue to be synchronized. To ensure that the folder is still synchronized, please check this in your Applicant Management.
- Are synchronized emails marked in Outlook?
- No. Currently, synchronized emails are not marked in Outlook.
- Is it necessary to activate “Application reference in the subject of emails” for synchronization?
- No, it is not absolutely necessary.
- Is there a way for an administrator to see which users have connected their Outlook account?
- No. This is currently not possible.
- Do we have to perform any steps in Outlook itself?
- This depends on your company's security settings. Please contact your internal IT to find out what steps are necessary to be able to use the Umantis Email-Connect.
- Is it possible to synchronize unsolicited applications that are received directly by email and are not yet in Applicant Management?
- Yes. Unsolicited applications that cannot be assigned to an existing application or person can be found in the Emails without assignment section.
- Does the Umantis Email-Connect only work with Outlook, or can I also connect other providers?
- Currently you can only connect Outlook to Applicant Management.
- Are all email attachments (including logos, signatures, etc.) automatically uploaded to Applicant Management?
- Yes. All email attachments are uploaded to Applicant Management.